Claude has the smoothest path of every client: you add the brain once as a custom connector on claude.ai, and the same connector is available in the desktop app and on your phone the next time you sign in.
At a glance
| Works on | Web (claude.ai), Claude Desktop for Mac and Windows, iOS and Android |
| Plans | Free (one custom connector), Pro, Max, Team, Enterprise |
| Sign-in | OAuth. Claude opens a LAN Brain sign-in page; no tokens to copy |
| Time | About three minutes |
| Team and Enterprise | An Owner enables the connector for the organization first (Organization settings, then Connectors, then Add, then Custom, then Web). After that each member connects individually |
Before you start
Open the LAN Brain dashboard, go to Your brain, then the Connect AI app tab, and copy your MCP URL. It looks like:
https://YOUR-BRAIN.brain.lanbrain.ai/mcp
Step 1: add the brain as a custom connector
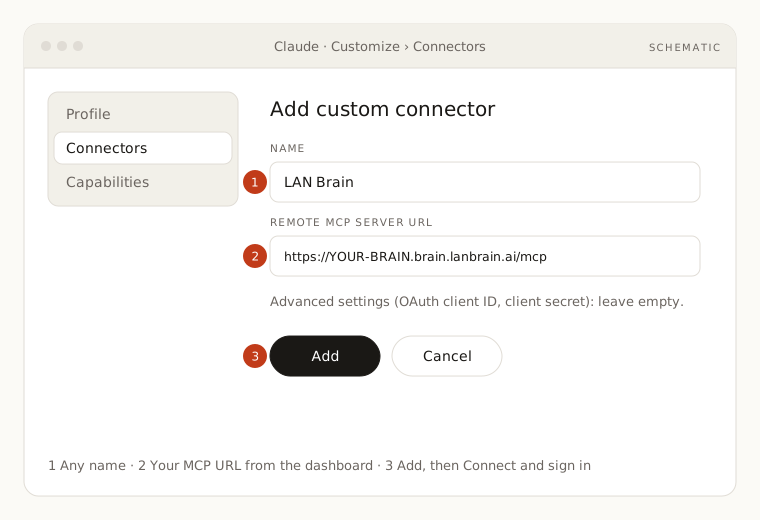
- In claude.ai, open Customize, then Connectors (direct link: claude.ai/customize/connectors).
- Click + Add and choose Add custom connector.
- Give it a name (for example
LAN Brainor your company name) and paste your MCP URL as the Remote MCP server URL. - Leave the Advanced settings (OAuth client ID and secret) empty. LAN Brain registers the client automatically.
- Click Add.
Step 2: sign in and authorize
- Next to the new connector, click Connect.
- A LAN Brain sign-in page opens. Use the same Google, GitHub or email account you use for the dashboard.
- Approve the access request. The page tells you which account is granting access; it never asks for a password inside Claude.
- Back in Claude the connector shows as connected, and its tools appear under the tools menu in any new chat.
Step 3: tell Claude to use the brain
Connecting gives Claude the tools. It does not tell Claude when to reach for them. Without instructions, Claude will happily answer questions about your company from its own memory while a fully connected brain sits unused.
- Copy the instructions block from the Connect AI app tab in the dashboard (it is generated for your account and already lists every brain you can reach).
- In claude.ai, click your initials in the lower-left corner, open Settings, and paste it into the field labeled Instructions for Claude.
- Save. The instructions apply to every new chat, on every platform.
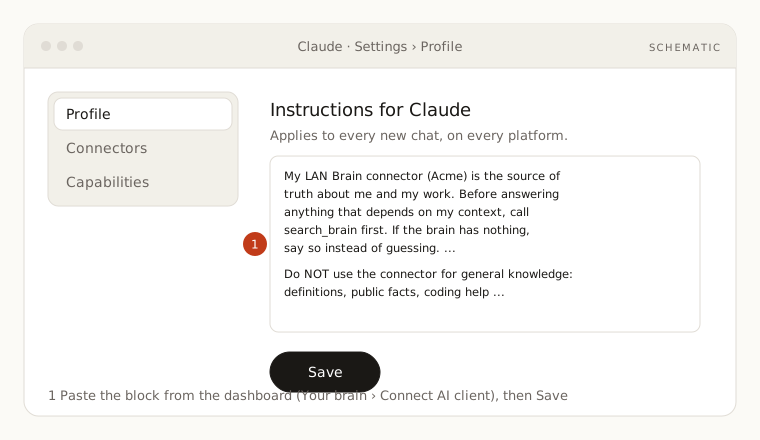
The block is short on purpose, around 150 words, because Claude reads it on every message. Everything else Claude needs is delivered by the brain itself at the start of each session. Why it works this way.
Claude Desktop and mobile
Nothing to configure. Connectors added on the web are account-wide. In Claude Desktop you will find them under Customize, then Connectors; on iOS and Android they appear after your next sign-in. Adding a brand-new connector directly from the phone is still in beta, so do the first setup on the web or desktop.
Try it
Open a new chat and ask:
- "What do we know about our biggest client, and who owns that relationship?"
- "Summarize the last three decisions in the product department and link me to the pages."
- "Before I write this proposal, check the brain for our standard pricing components."
A connected Claude answers with page paths (for example wiki/decisions/d-012-enterprise-pricing.md). If it answers without any path, it did not search. Say "check the brain first" once; the instructions block prevents this going forward.
If something is off
- The connector is not listed in a chat: open the tools menu (the sliders icon next to the message box) and enable it for that conversation.
- Sign-in keeps looping: you may be signed into LAN Brain with a different account than the one that has access. Sign out at lanbrain.ai and connect again.
- You changed the connector name or URL: Claude cannot edit a connector in place. Remove it and add it again.
- Team or Enterprise members see no option to add it: the organization Owner has to enable the connector first.
More in Troubleshooting.